The Solution :
Simply use web browser control ...
Web browser control gives you the ability to host web pages and other browser enabled documents inside your application.
What you will need is...
Microsoft Visual Studio 2005. The Web Browser class is a new feature in the .net framework version 2.0. You can find the complete code of our application here.
Let's Begin..
Start Visual Studio 2005, and create a new Visual Basic windows application. In the Form1.vb design view open the Tool Box and select the 'Common Controls' panel, then select the web browser control. Drag and drop the selected web browser control inside the surface of Form1 and display its properties.
- Change the name property to "MyWebBrowser", and in the URL property type an address of a website as your web browser's default address.
- Select Form1 and display its properties, then change its Window State property to "Maximized"
- Add the following items to the Form:
Control Name Text Label Address Text Box TB_Address Button Btn_GO Go Button Btn_Back Back Button Btn_Forward Forward Button Btn_Stop Stop Button Btn_Refresh Refresh Button Btn_About About
- Arrange all of the aforementioned controls on the surface of Form1 (See figure 1)
- Display Form1 properties and change the AcceptanceButton property to Btn_Go, this will activate the "Btn_Go" click event automatically when the user clicks the enter key on the keyboard which in turn will have the benefit of allowing the user to type a URL to navigate to and then to just press the Enter key without need to essentially click the Go button using the mouse.
Using the Web Browser Control
Double click Form1 to activate the Form1 Load event and type the following code:
4 Me.MyWebBrowser.AllowNavigation = True |
When setting MyWebBrowser.AllowNavigation property to true, this gives your web browser the ability to navigate to other web pages after its initial page has been loaded.
Setting MyWebBrowser.AllowWebBrowserDrop to true will allow your browser to navigate to and display documents when they are dragged and then dropped inside it.
Double click the Go button to activate its click event handler, and then write the following code:
8 If Me.TB_Address.Text = "" Then Return |
In the above code we check whether or not the user has entered an address into the address text box.. If an address is found, then we order our web browser to navigate to this address.
Now if you run the application and typed an address into the address text box, then the browser will take few seconds and it will display the web page of the address you typed. If you click any link in this web page, your web browser will navigate to this link but the address text box will not reflect the address of the new web page.
To solve this problem you need to know about the web browser Navigated event. This event occurs when the web browser control has navigated to a new page and has begun loading it; in this case the URL property of the web browser will contain the address of the new page.
Now handle this event by choosing Form1 code view then from the left drop down combo box select "MyWebBrowser", and from the right combo box select "Navigated". Inside this handler you will need to type the following code:
12 Me.TB_Address.Text = Me.MyWebBrowser.Url.ToString |
The web browser control maintains a history list of all pages visited during a browsing session, you can go back and forward in this history list by using the web browser control's methods GoBack and GoForward as in the following code:
Double click the Back button to activate its click event handler, and then type the following code:
15 Me.MyWebBrowser.GoBack() |
Double click the Forward button to activate its click event handler, and then type the following code:
18 Me.MyWebBrowser.GoForward() |
As mentioned before, the Web Browser control maintains a history list of all visited pages, a copy of those pages is saved temporarily in a local temp directory. We typically refer to those saved copies by the term 'cash'.
Refreshing ... and Stopping
When you order your web browser to navigate to a page visited before and is still exist in the cash, the web browser control loads the page from the local cash not from its the web server. To force the web browser control to load this page from its server to reflect its current state (that may be changed now) you need to use the Refresh method of the web browser control.
Double click the Refresh button to activate its click event handler, and type the following code:
21 Me.MyWebBrowser.Refresh() |
To implement a stop button into your web browser, you can use the Stop method of the web browser control as follows.
Double click the Stop button to activate its click event handler, and type the following code:
24 Me.MyWebBrowser.Stop() |
Below is an image in which you can see the final version of our web browser.
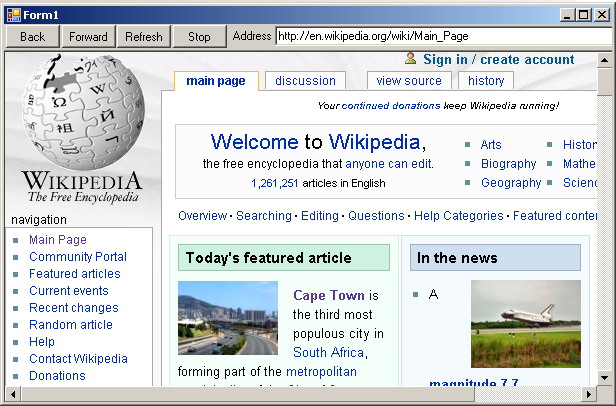
Figure 1
The Document
The web browser control gives you the ability to access the document that is currently loaded, or even to display whatever text you want to display through its document properties.
You can get the currently displayed document as text by using the "DocumentText" property, or , on the other hand, you can set this property to whatever text you need to display and it will be displayed immediately instead of the currently displayed page. This is useful when you want to display something inside your web browser control's area according to some user actions not to navigate to a given URL as we described in the above example. You can, as well, get the currently displayed document as text and do whatever parsing or processing on its contents.
Note: you will get the document text in html format including all its html tags and properties.
You can also get the currently displayed document as a stream of bytes by using the "DocumentStream" property.
You can use the "Document" property to access the contents of a the displayed html web page through the Html document object model (DOM). This DOM model handles the HTML page as a tree of tags and properties of those tags, this can be useful when you want to use some web based controls inside your form.
To learn how to use the "DocumentText" property; review the following code:
27 Me.MyWebBrowser.DocumentText = "Hello World <br> " + _ |
The above code will run after you click the About button at run time, It will display some text in the client area of our Web Browser control. Shown in the following picture:
Figure 2
To handle the the currently displayed page as a DOM model you can, for example, use the following code which changes the color of some of the document parts:
31 Dim Doc As HtmlDocument |
By using the DOM model you can access all of the HTML document elements, getting these values or setting new values for them like: the document background color, foreground color, and link color.
You can also get any document element by its id or name. The following lines of code demonstrate how to get an html element called "q".
37 Dim Elm As HtmlElement |
The following lines of code demonstrate how to get a collection of all hyperlink elements of the currently displayed web page, traversing the collection and displaying the text of each link element inside this collection.
40 Dim ElmCol As HtmlElementCollection |
To test the above code and to find out how this can affect the currently displayed page, type this code inside any button click event handler, run your application, and then write any URL inside the address text box of your browser and click go, then click that button to see the effect.
You can find the complete code of our application here.
For further information
- Refer to the online copy of Microsoft Developers Network at http://msdn.microsoft.com or use your own local copy of MSDN.

No comments:
Post a Comment